Tuesday, August 31, 2010

HDR in Aperture

Photomatix Pro is the software I've been playing with to create HDR photos. It's available standalone and as a plug-in for Aperture, Photoshop, and Lightroom. Since I have Aperture and like using it for post-processing, I decided to download the plug-in version of Photomatix. I like this even better! Not only do I have one-stop shopping for creating HDR photos and then manipulating them further if I choose, but I can also easily take one RAW photo and create two other versions with the different exposures and merge them into an HDR photo. Below is one result:
Now here's another before and after. For this picture I took the original RAW image (I only took one with my camera), created two more versions with the lower and higher exposure, and then created the HDR photo:

Before:
After:

More Tilt-shift and HDR

I've spent a little more time playing around with my photos. This past weekend, we drove to Salem, and I took some pictures with the different software in mind.

First, I took some photos of the town from the top of a parking garage and edited them in Photoshop using the tilt-shift method, as well as enhancing the color saturation:
Then I took photos with HDR (high dynamic range) editing in mind. The best way to do this is to find interesting subject matter and take at least three photos in different exposures. The point is to highlight different parts of the photos using the different exposures and then combine the photos so it appears more true-to-life. For more explanation on HDR photography, check out this guy's page. He goes into a lot more detail. My camera has auto-bracketing, which means I can make the camera do all the work. It's a setting that enables the camera to take three photos in quick succession, using the three different exposures (-2, 0, +2). Ideally, you want to use a tripod so there's no movement between the photos. I didn't have one but was able to align the photos using the HDR software. I'll admit I wasn't too pleased with the results. I think it's because the subject matter of my photos wasn't ideal for this kind of manipulation. Based on photos I've seen on HDR sites, you get better results with clouds, water, sun, and interesting buildings all in the same shot. If you visit the above link, you'll see what I mean. Or just click here for images on Google.

Below is what I was able to get. Mind you, I've just started playing with the software and have yet to find more suitable subject matter:
Since I didn't post the originals, you can't see the difference. So let me show you a few before and after photos I created using RAW photos from my San Francisco trip:
Notice how the colors are brighter and more pronounced? The HDR photos actually look more like what I saw in real life than the originals.  I'm still working on getting photos that can get cool results like in some of the links I showed you. Unfortunately, I don't often travel to Europe!

Here is a photo I edited using both HDR and tilt-photography methods:

And here is a photo I edited using HDR to enhance the colors in image and then Aperture to gray out the background:

More to come, once I can take more pictures and get better acquainted with Photomatix Pro. It doesn't help that the trial leaves a watermark on all the HDR photos, which I then have to manually remove in Photoshop. *sigh* Maybe once I get a full-time job I can afford Photomatix!

Tuesday, August 24, 2010

Tilt-shift photography + more

I've been playing around more with some photos using the tilt-shift effect in Photoshop. The results I got aren't ideal, mainly because I didn't take the photos with this editing in mind. But I did have fun playing around and will definitely look to take some photos with this editing method in the back of my mind. Here are the before and after shots:


With better original photos, the tilt-shift effect makes the photo almost look like a toy model.

Here's another photo I improved in Photoshop. I made a copy of the original, increased the exposure, and then layered it on the original. Then I used a gradient to only increase the exposure in a specific spot (where the corks are dangling). Finally, I slightly adjusted the hue and saturation of the photo:


Here are some photos that I just edited by cropping and adjusting hue/saturation using Aperture:

Tuesday, August 10, 2010

The Frustration of Photography

I love using my camera and taking photos. It makes me see things in a different way; life through a lens. Instead of seeing a rusty buoy bobbing in the bay, I see an interesting juxtaposition of orange and blue that must be captured.

But photography is like any art -- I am constantly learning and trying to improve my skills. In the beginning, I mainly focused on composition, since I was limited to a point-and-shoot. There's not much you can do, besides choose one of its settings, like "scenery" or "party." Then there was the in-between step, with my Fujifilm. It was a point-and-shoot (PaS) with some flexibility for manual adjustments, like aperture and shutter speed. But because deep down it was still a PaS pretending to be a digital SLR, composition was still the number one factor.

That's a good thing. Because now that I'm working with a true digital SLR, I can focus less on composition (it's more automatic in the back of my mind) and more on playing with the camera settings and using different lenses.

Here's where it gets frustrating. Every time I learn something new, like cool effects I can do with the prime lens, I think back to all the photos I've taken in the past and wish I'd known then what I know now. Even as I write this, I know in another few months, I'll probably be thinking the same thing about photos I'm taking today. I'm aware that this frustration isn't limited to photography or myself. Even so, it's not a pleasant feeling. I see the many pictures I took of Max with my PaS and Fujifilm and wish I'd had the Canon back then, so I could have gotten some great photos. Not that my 200+ photos of Max don't accurately capture his essence. But it would have been nice to get photos of Max similar to this one I recently took of my parents' cat, Colbert:
It may be difficult to see in a compressed version, since you lose some of the detail, but since I used the 50mm prime lens for this shot and had the aperture wide open, I was able to get a blurrier background and focus more on Colbert. With my old cameras, the whole photo would have been sharp as hell, so the subject wouldn't have stood out as much.

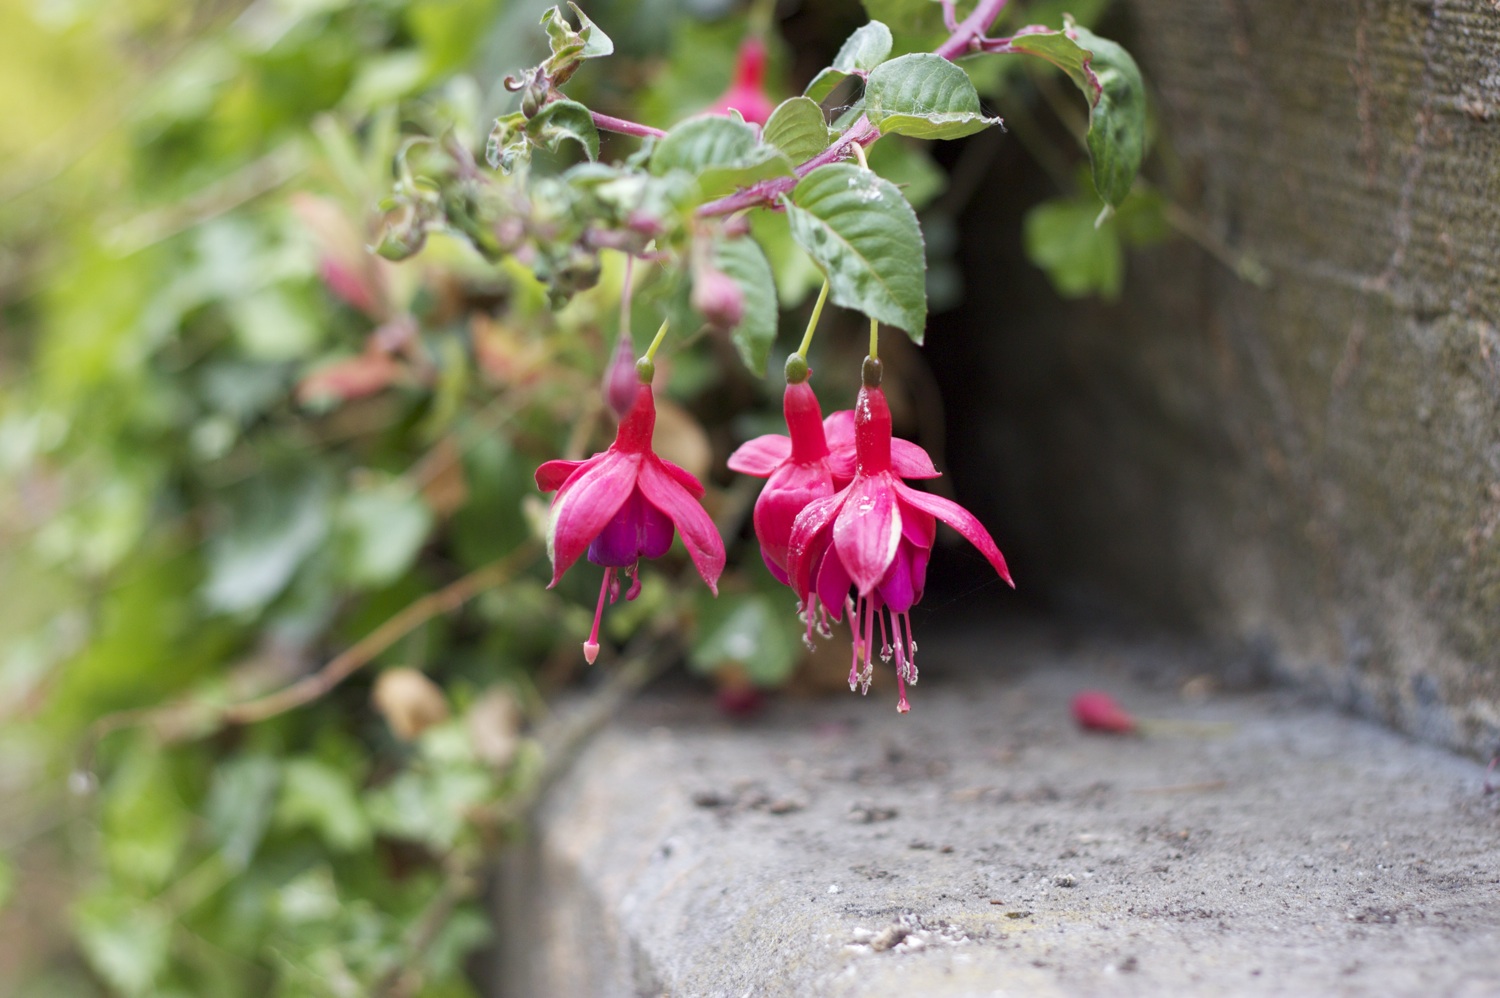
And though I get the instant gratification of seeing the photo on the camera's LCD screen, I can never tell how it will look once uploaded to my computer. An image that looks focused on my camera's display often looks slightly blurry once full-sized. Take this one, for example:

The orange rose looked crystal clear in my viewfinder and again on the LCD screen. But it's not. This is a case where auto focus would have been helpful, if I could have gotten the camera to focus on that specific flower. That's a challenge unto itself (or maybe a skill I have yet to perfect). But then you can see in this photo, manual focus worked out a little better:

I guess the key to using manual focus is being sure your vision can be trusted! Maybe I need glasses...

The final source of my frustration is lenses. As an owner of PaS cameras most of my life, I didn't think at all about lenses. But now that I have a camera that can use different lenses, I'm starting to understand why photographers spend all their money on them. And I'm not exaggerating. A good lens costs more than the digital camera itself. When I first bought my camera, my digital photography teacher suggested that instead of getting the kit lens (18-55mm) and a higher zoom lens (I think it went to 200mm), I invest in the 50mm fixed lens. At first I thought she was crazy. Why would I want a lens that couldn't zoom in and out? But now I know...the fixed lenses really are the way to go. The photos you get with these lenses look so much better. They have an artsier feel. You sacrifice some quality by using a zoom lens.

That brings up another whole problem: you need to get various fixed lenses to meet your needs. Right now I have only the 50mm lens. But what about when I want to get a photo of something in the distance, say, a bird perched in a tree? Or what if I want a lens that has different aperture settings? Then there's the fun of switching lenses to get various shots. Just ask my mom. I can't tell you how many times I asked her to hold on, so I could switch from my 50mm lens to the zoom lens, so I could get both close-ups of flowers and wider-angle shots. My current camera bag fits the two lenses comfortably. But if I were to get a third lens, well, we're going to need a bigger bag.

The bottom line here is that as I hone my skills, I get frustrated thinking about how much better my old photos could have been. But it also motivates me to keep practicing, so I can start being happy about how my photos turn out each time.

Friday, August 6, 2010

Golden Gate Park - Botanical Garden

I edited these photos using Aperture. The first photo is the original, unedited, and the second is edited. For all of these, I just cropped them and altered the colors.


Wednesday, August 4, 2010

San Francisco Photos - Edited

I know, I've been back from San Francisco for almost two weeks, and I'm just finally getting around to posting the photos from it. Well, I have over 400 of them in RAW format (so each photo is upwards of 10 MB) that I've been sorting through and converting to smaller JPGs that can be posted online. In a desperate attempt to get something posted, I played with a few photos in Aperture and Photoshop and will show you the befores and afters.

My first photo is of the sunset we saw on our way back to the city from Carmel.

For this photo, I was all the way zoomed out with a focal length of 18mm. My f-number was f/4.5, which is fairly low to let more light in. The shutter speed was 1/125th of a second, which isn't too, too fast but isn't slow either. I think it's easier to get shots like this with a higher shutter speed and lower f-number, so there's a lower chance of blurring.


Here is the edited version. As you can see, the colors are a little brighter and more vivid. I altered this in Aperture by pumping up the saturation and then brushing it into the sky, leaving the water and sand alone. I didn't really do much to this photo, because the content is fairly simple.


My second photo is of a rose we passed while descending the stairs from Coit Tower. This is just the first of many flower photos you'll probably see -- I think about half of the 400 photos I took were of flowers.

I used my 50mm fixed lens for this shot, so I could get really good focus on the flower while blurring out the background. To do that, I used the low f-number of f/2.5 and then a fast shutter speed (1/2,500 of a second) to compensate, since it was bright outside.


Here is the edited version. All I did here was crop the photo so the rose is more of the focal point. Then I eliminated the color saturation on the entire photo and brushed back in the color of the flower.


This final photo I took from a moving trolley, so it wasn't ideal right off the bat.

As you can see, it's a bit over-exposed and framed a little strangely. The focal length on this shot was 27mm with f/5.6 aperture and 1/400th of a second shutter speed.


I used Photoshop for this image. First I cropped it a little bit and then removed the building from the upper left corner of the image using the clone tool. Then I edited out the flag that was on the bottom, next to the tree. These are things that are more difficult to do in Aperture, since it's more of a post-processing application instead of photo editing. Finally, I slightly adjusted the exposure for the entire photo and then focused in on the steeple using the burn tool.